
In this tutorial I am going to show you how to route your computer’s system audio output into a piece of audio recording software. Some potential situations that you would want to do this for would be as follows. What if you needed to record the audio from a Skype or FaceTime session? Or you wanted to do some creative re-sampling of a piece of audio? Maybe you want to record something from the web like Tone Generator (a frequency generation tool only available on the web), like a student and I did for RAW (Reed Arts Week) recently. You could also use it for a live situation where you wanted to capture everything you did on your computer.
Soundflower is an excellent open source solution. Soundflower already exists on most lab machines on campus. In general, computer UI’s have chosen to use physical metaphors to make the user interface easier to understand. For example,“folders” or “desktop” instead of “directory”. So, Soundflower is a program that allows you to internally route audio via “virtual audio cables” (file paths) from your computer’s system output to recording software.
Soundflower creates a virtual “audio device” on your machine that your audio system can see. Soundflowerbed allows you to monitor Soundflower’s output through your computer’s internal speakers or headphone output. Soundflowerbed is good to use in conjunction with Soundflower, as it will allow you to hear the sound of the audio you are routing.
Soundflower and Soundflowerbed can be downloaded from here. There is also access to a more recent beta version of Soundflower without Soundflowerbed here. (Note: use this only if you already have Soundflowerbed installed as it will only update/ install Soundflower.)*
Here is an example using Quicktime, although this workflow should work with any recording program. This example assumes you have Soundflower and Soundflowerbed already installed.
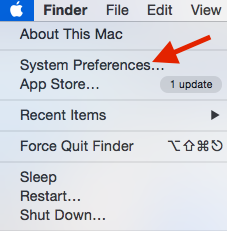
Step One – Initiate Soundflower: Open System Preferences
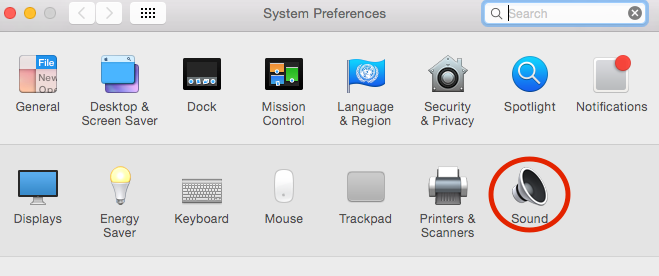
Step two: Go to Sound
Step three: Select Soundflower (2ch) under your system Output settings.
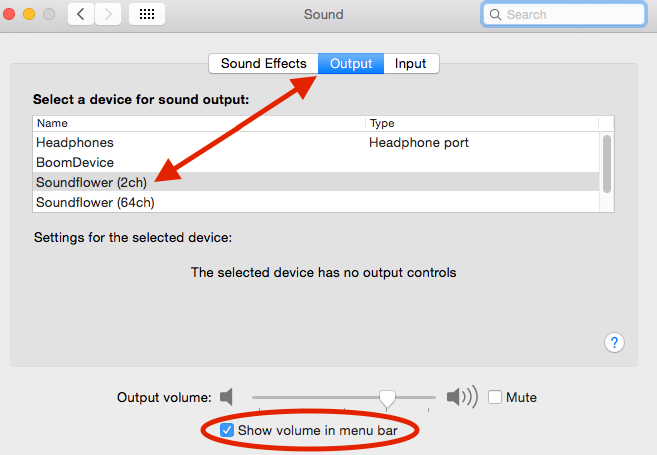
Another way to adjust your sound output/input settings is through one of my favourite shortcuts on a mac. If your sound icon is not in your menu bar you need to make sure the “Show volume in menu bar” box is checked as is circled in the above example.
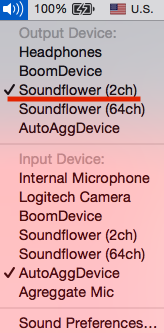
Once checked and in the menu bar simply Option + Click on the speaker icon and choose Soundflower (2ch) in your drop down window under Output device.
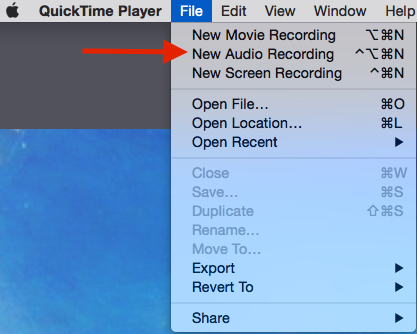
Step four – Connecting to your audio recording app: Open Quicktime and select “New Audio Recording” from you drop down window in the menu bar
Step five: Choose Soundflower (2ch) as your audio recording device from the audio input selector triangle

Step five: In order to be able to have the sound pass through through your internal speakers you need to open Soundflowerbed ![]() as mentioned earlier. You can find this application in your Applications folder (Applications > Soundflower> Soundflowerbed ). Once opened an icon for Soundflowerbed will appear in your menu bar.
as mentioned earlier. You can find this application in your Applications folder (Applications > Soundflower> Soundflowerbed ). Once opened an icon for Soundflowerbed will appear in your menu bar.
![]()
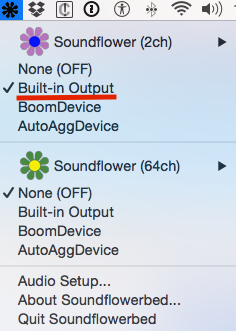
Step 6: Click on the icon and under Soundflower (2ch) choose “Built-in Output”.
Finally, press record in Quicktime and any audio coming out of your computer will be recorded into Quicktime. The keyword is any so make sure you turn off all alerts and any internal sounds that you do not want to record. When you are done recording be sure to return to your sound settings and change back to your preferred system output.
Soundflower is a good tool to have in your audio toolbox. You can find it in the PARC in room 327 and on various other computers around campus.
As always, come by the PARC with any questions or email me at joejaniga@reed.edu and stay tuned for more tool talk in other posts.