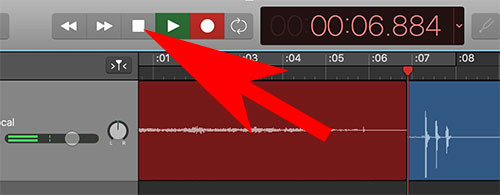
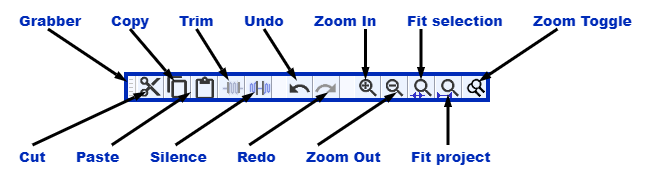
The Transport controls can stop/start your audio in your timeline, forward and rewind, take you to the beginning of your project, among other tools
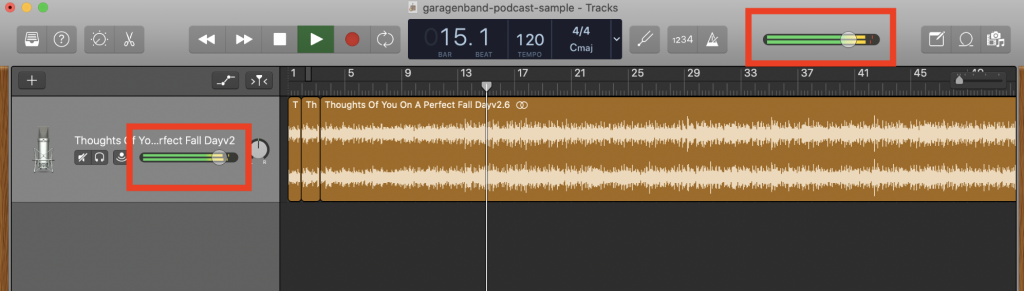
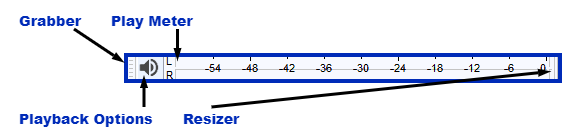
Master volume control
The master volume slider will increase/decrease the volume of your entire project. Ideally you want to have the audio’s loudest regions in the yellow regions, but not in the red.
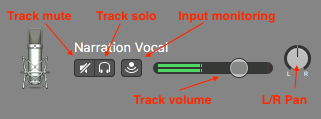
Track controls
Each track has individual controls to mute (make that track silent), solo (make all other tracks silent), as well a volume meter to view how loud the track is, and a volume slider to increase/decrease the loudness of an individual track.
Each audio track recording has a waveform, which is a visual representation of the audio. As your audio plays back, both the individual and master track volume meters will indicate how loud or quiet the audio is in your project.
Ideally you want to have the audio’s loudest regions (indicated by larger spikes in the waveform) in the higher green to yellow regions, but not in the red. Adjust the individual track volume slider so that most of the audio played back is in the higher green to yellow region, but not go into the red.
Audio playback
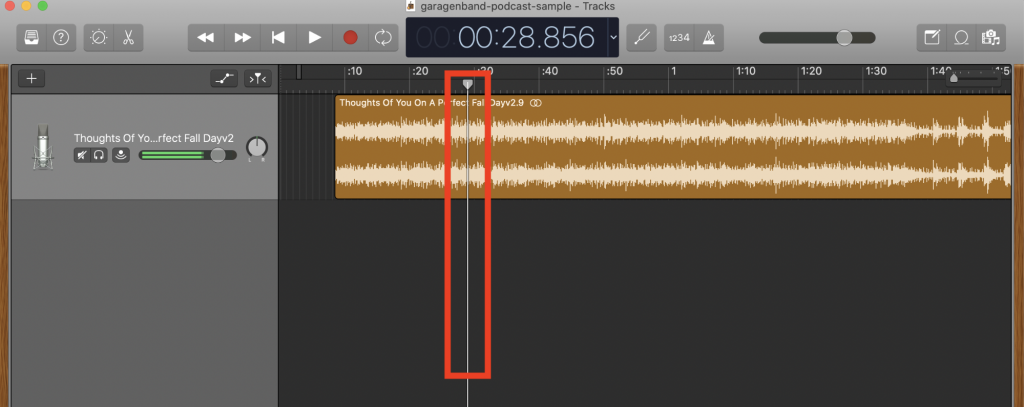
The playhead (the downward facing triangle connected to a vertical line) indicates where in your project the playback will start.
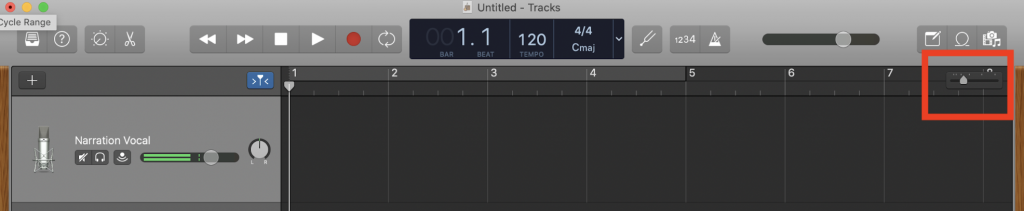
Timeline navigation
To zoom in and out of your timeline, click and drag on the zoom icon.
Track Playback
Setting up your first project
These instructions are for setting up a project for a podcast.
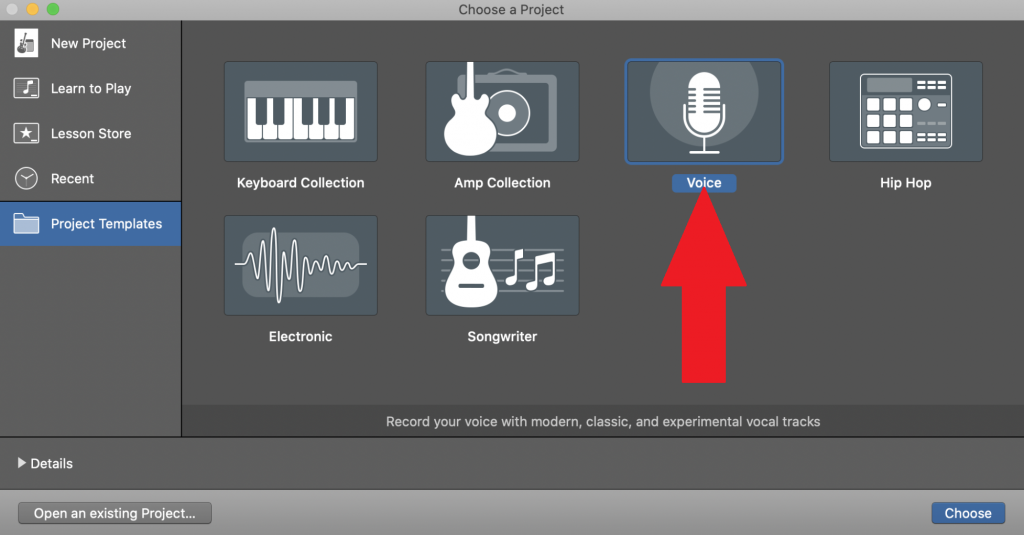
Launch Garageband; a template window will open. Click on Project Templates, then choose Voice.
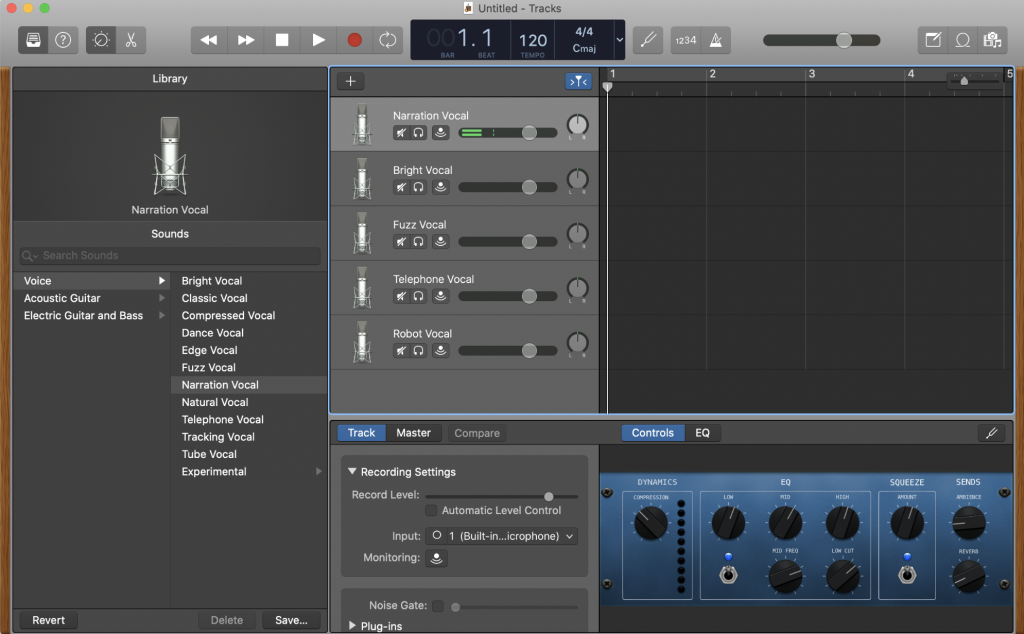
2. GarageBand will open up a new project similar to the screenshot below.
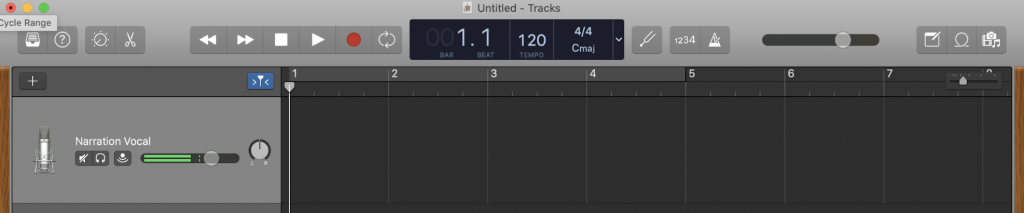
Close down several windows to focus on the main editing timeline. Choose View/Hide Library and View/Hide Smart Controls.
Each horizontal row is an audio track. Select the Bright Vocal, Fuzz Vocal, Telephone Voice, and Robot Vocal tracks, and hit the delete button. Your project should now look similar to the screenshot below.
3. Save and name your project. The default location will be in username/Music> GarageBand/; save to another location, if desired.
4. Drag a pre-recorded audio track (audio mp3, aiff, or wav file) onto this track.
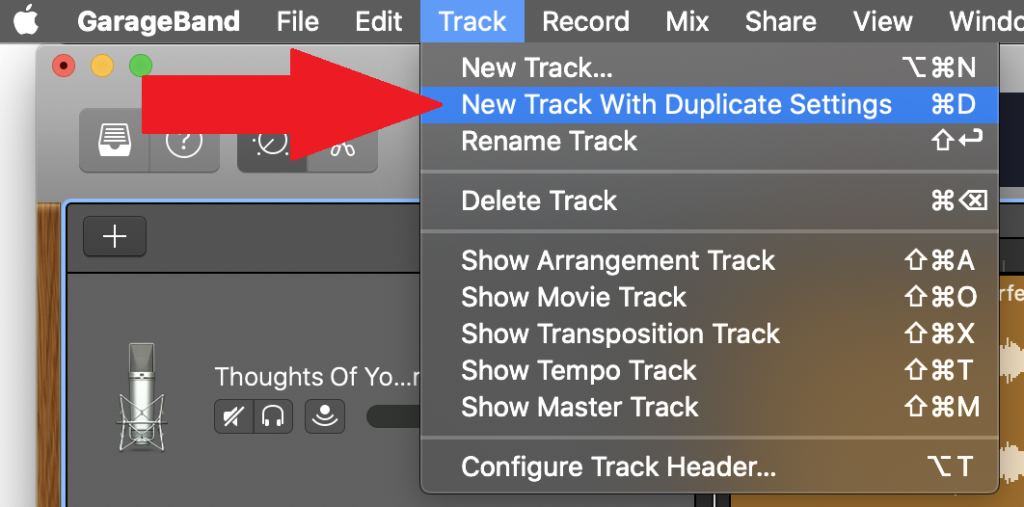
If there are additional audio tracks, create a new audio track by going to Track/New Track with Duplicate Settings (command-d keyboard shortcut), then drag the audio track to the new track(s) you created.
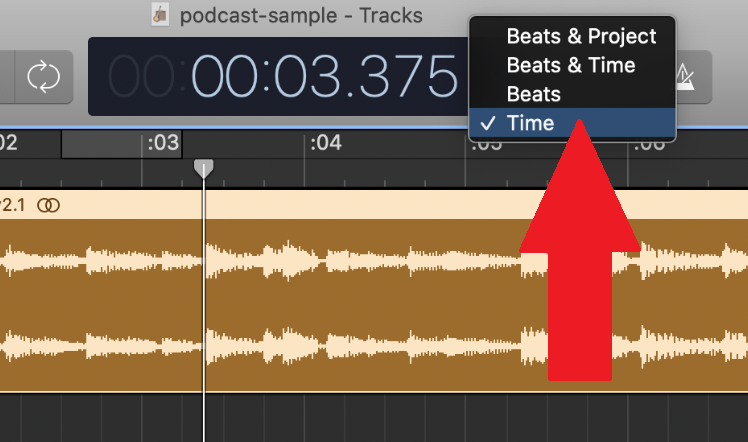
5. Set your time view from Beats and Project to Time, which will give you an hour-minute-second view of your project.
Recording in GarageBand
After Setting up your First Project, you will want to review recording tips for the best possible recording, check your microphone settings, then start your recording in GarageBand.
Recording tips
Record in a quiet environment. Be aware of any external noises in your recording environment, and try to remove or reduce them.
Keep your microphone in the same spot for the entire recording process.
Keep yourself about 1-2’ from mic, with the microphone angled slightly away from your mouth.
Use a pop filter or windscreen, if you have one.
Headphones are a must so you can hear your levels, and avoid feedback. You can check out headphones at the PARC.
Check your microphone settings
You can use your internal microphone built-in to your computer, but it is recommended to use a USB microphone or an audio headset for any audio recordings; some are available at the PARC for checkout, or you can contact ITS@reed.edu for a short term loan if equipment is available.
Note: If you are using a USB microphone, go to GarageBand’s preferences and click on the Audio/Midi tab. Make sure your input device appears as your microphone, if it doesn’t show up, you may need to quit GarageBand, unplug and replug the microphone in, then restart GarageBand.
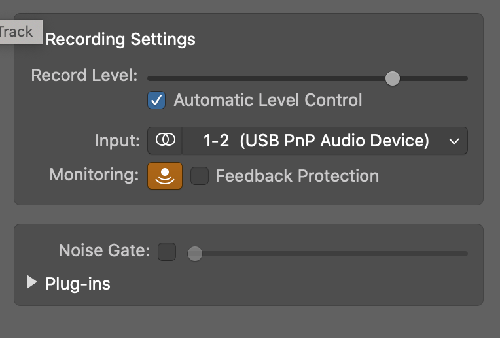
Access the Smart Controls panel
Either click on View/Show Smart Controls, use the keyboard shortcut B, or click on the Smart Controls at the top right of the GarageBand interface to access the Smart Controls panel. On the left is Recording Settings.
Turn on Automatic Level Control, which will adjust your audio if it’s too loud or quiet.
Turn on Monitoring if you have headphones, and want to hear yourself as your audio signal as you record.
Turn on Feedback Protection if you aren’t using headphones.
Start your recording
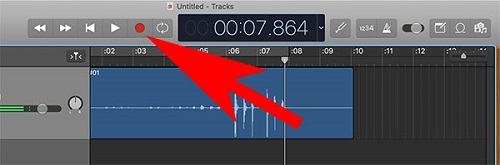
Select the track you want to record on.
Position your playhead where you would like to start recording. By default this will be the beginning of your recording, but after a few recordings, it may be in a different part of your timeline.
Click the red Record button to begin recording
4. Click the Stop button to finish recording.
Edit your recording
Headphones are a must when editing so you can hear the audio clearly. You can check out headphones at the PARC.
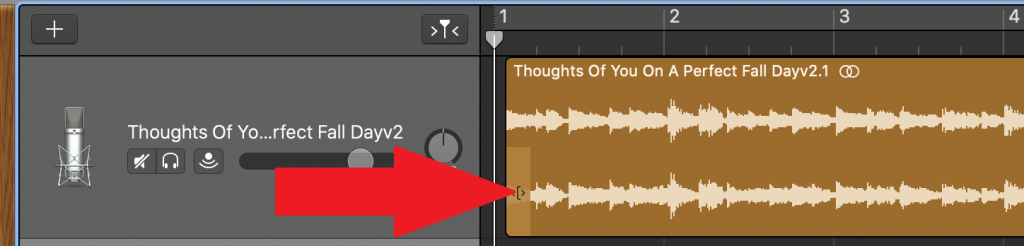
Trimming a clip
You may want to remove the beginning or end of an audio clip. Trim your clip’s beginning or end by going to the beginning or end of a track; your cursor will change to a bracket icon. Drag the audio to the desired area to trim.
Splitting a Clip
To split a clip in the middle, move the playhead to where you want to split a clip. Choose Edit/Split regions at Playhead, or use the command-t keyboard shortcut.
Presplit clip:
Split clip:
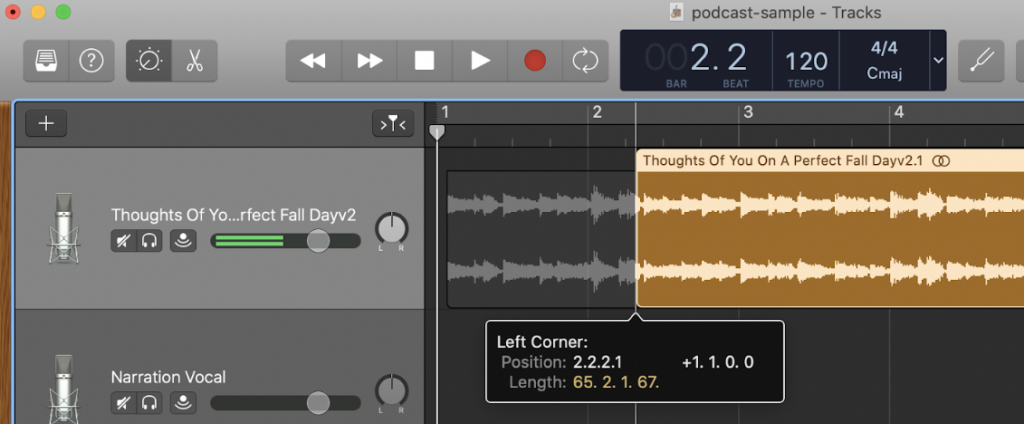
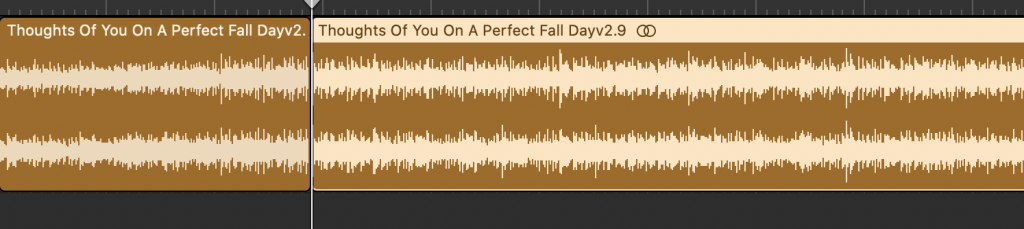
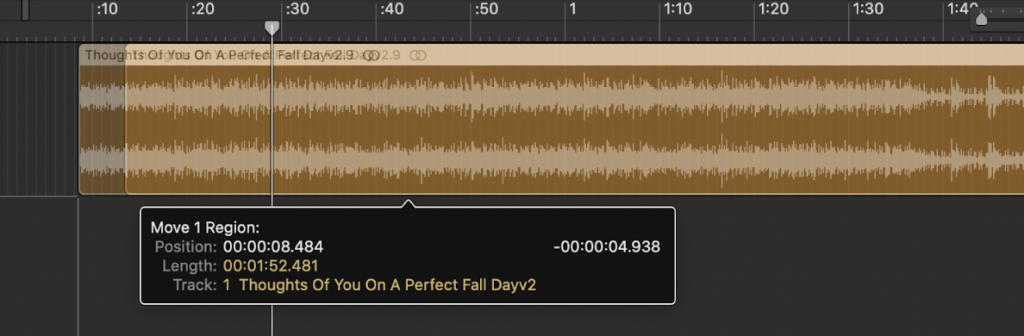
Moving a clip
To move a clip, select it and drag it to its new location.
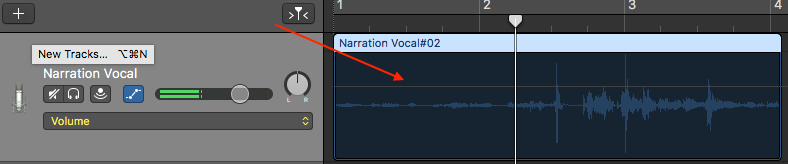
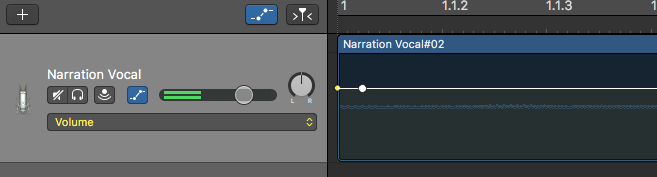
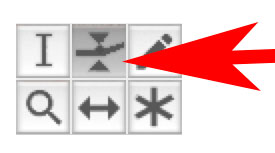
Fade in/out the volume of an audio clip
Most times you will want to fade-in or fade-out the audio’s volume, to avoid any abrupt audio transitions. To do so, turn on automation; go to Mix/Show Automation, or press the “A” keyboard shortcut.
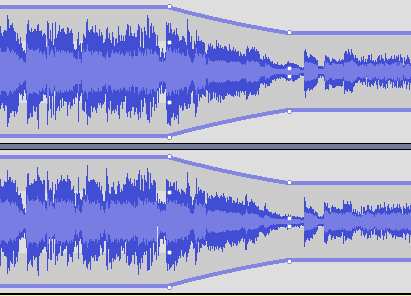
Your track will now look like this; volume is the default view (indicated by the dropdown menu). The faint horizontal line running above the waveform represents the current volume level of the track.
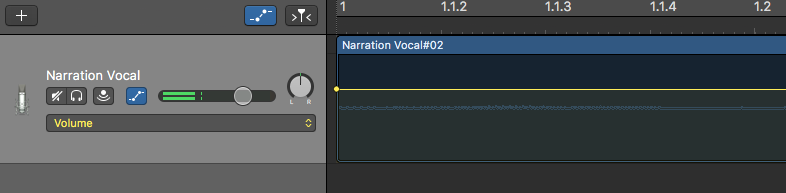
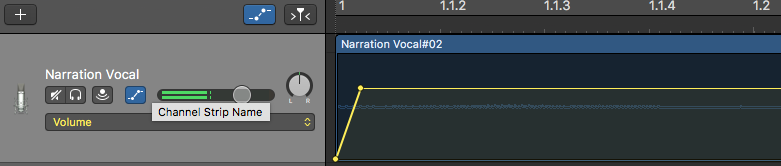
Fading in audio
Click on the line so it turns yellow; click at the beginning of the track to set a control dot.
Click a little farther down the line to place a second control dot.
Drag the first control dot all the way down. This will start the volume from zero (inaudible) to the volume you have set in the second dot.
Press A to turn automation off.
Fading out audio
Reverse the above process to fade an audio track out; keep the first dot at the original sound volume, and drag the second dot to the bottom.
Exporting your track
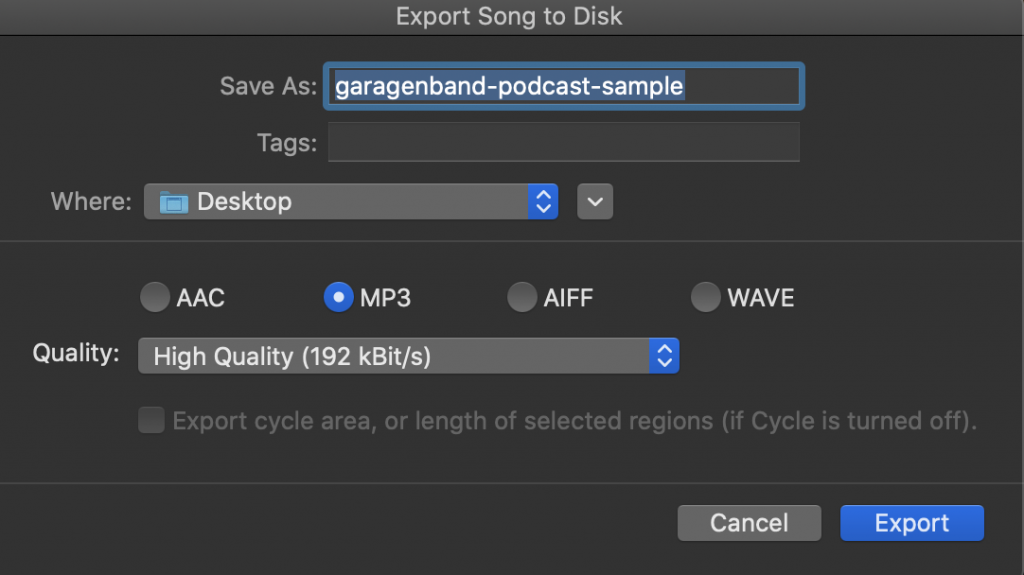
Go to the Share/Export Song to Disk. Select Mp3 and High Quality (192 kBit/s). Click on the Export button.
Audacity is a free open source audio editing program developed for macs, pcs, and linux, and can be downladed at https://www.audacityteam.org/. There are plenty of help documentation online, but here are a few quick tips to get you started.
Quick note: If you are running Audacity on Catalina, you may need to read up on how to make Audacity work in Catalina. Ideally if you run this code in the terminal, Audacity will work:
open /Applications/Audacity.app/Contents/MacOS/Audacity
Audacity’s tools
Audacity has a number of toolbars, but these are the most commonly used:
transport toolbar
tools toolbar
edit toolbar
recording meter toolbar This will indicate when your recording is too quiet (very little green showing, in the -54 range) or too loud (in the red, or at zero); ideally you should record in the -18 to -12 range.
playback meter toolbar You should have audio levels not go into the red (at the 0 range).
Add an audio clip: Drag and drop audio onto Audacity’s interface. Mp3, .aiff, and .wav files usually are good. You can also choose File/Import/Audio.
Split: Edit menu/Clip Boundaries/Split
Trim a selection: highlight a selection that you want to save, the choose Edit/Remove Special/Trim Audio. (many options here!)
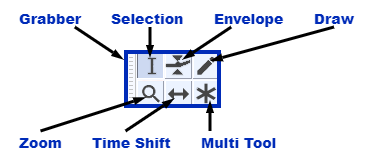
Move a track: Highlight the audio you want to move, then choose the Time Shift tool. Drag the audio to the preferred location.
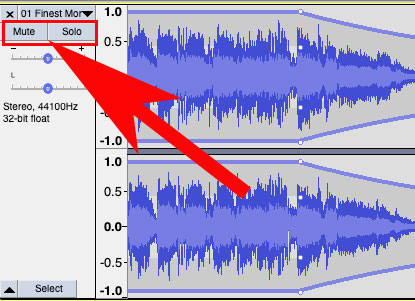
Mute or Solo an audio clip
Click on Mute or Solo on an audio clip’s track (indicated by the read arrow, at the top left on an audio track) to either mute it, or make it the only audible sound on playback. Mute/solo can be done on multiple clips.
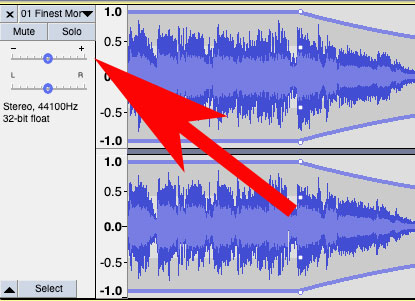
Increase/decrease the volume of an audio clip
Increase: You can either manually move the volume up by dragging the volume slider left or right (indicated by the red arrow, located just below the Mute and Solo buttons on the audio track). Or, you can choose the Envelope Tool, then drag up. The audio waveform should increase. If the clip is already at its maximum, highlight the clip, then choose Effect/Amplify. Drag the amplification slider to a larger setting.
Decrease: Choose the Envelope Tool, then drag down. The audio waveform should decrease.
Sound ducking: An audio term that is used when onetemporarily decreases/increases the volume of one audio source so that another audio source can be heard more readily.
Choose the envelope tool; click-drag down to make the initial volume setting. Choose another point where you want to increase/decrease the volume, then click-drag again.
To remove the white keyframe points, click-drag the white point upwards.
Loop an audio track or selection
With the selection tool, click and drag on the area you want to loop.
Go to Transport/Playing/Loop Play (keyboard shortcut: Shift-spacebar)
Exporting an audio clip
To get the highest quality (uncompressed audio file), choose Files/Export as WAVE signed 16 bit. Click OK on any warnings.
The Performing Arts Resource Center (PARC) in the Performing Arts Building (PAB) has added two Moog analog synthesizers to our continually evolving A/V editing room 327!
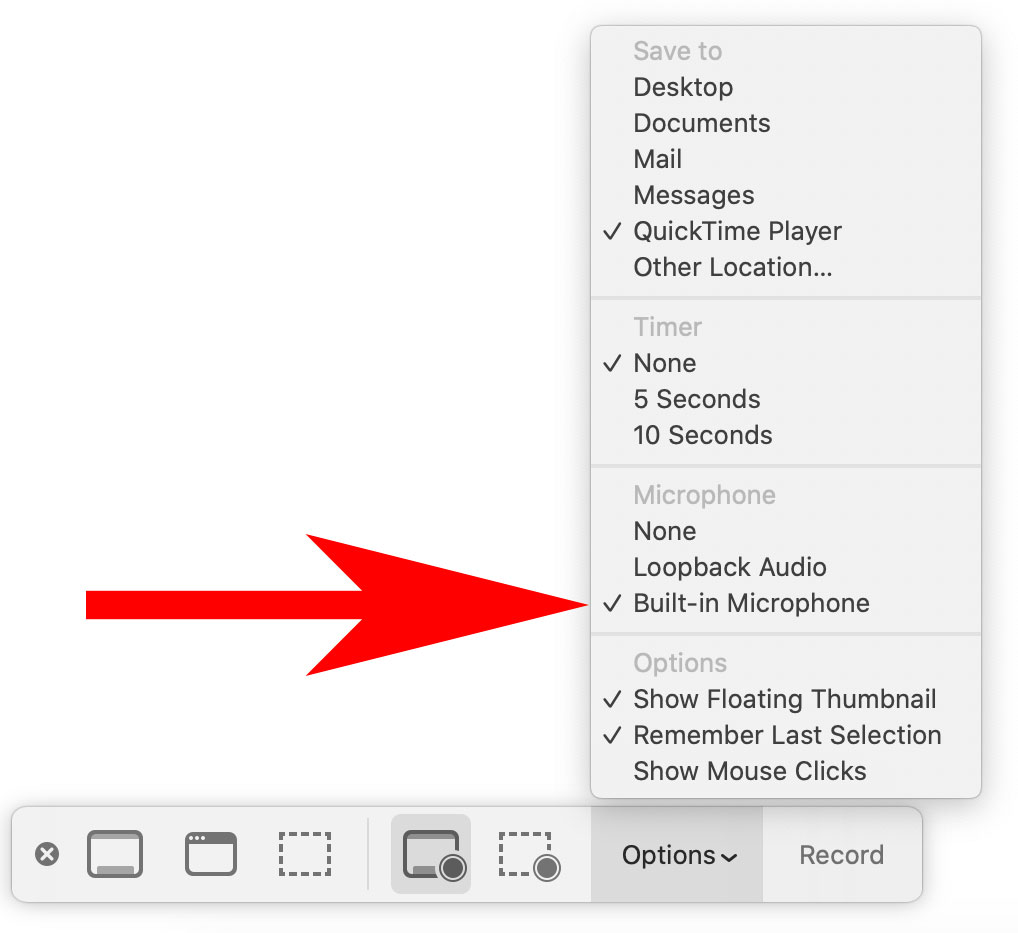
Open the media you want to screen capture in your application (if it’s a browser, use Firefox or Chrome, not Safari). Start at least 5 seconds before where you want to start – this will usually give time for the application to hide any playback controls which might be distracting. Don’t press play yet.
Go to System Preferences/Sound. In the sound Output, choose Loopback Audio in the Output tab. At this point, you will hear no sound from any of your Mac’s applications, but don’t worry.
Go to the QuickTime Player application; choose File/New Screen Recording.
Choose if you want to record all your screen, or a portion of your screen (highlighted in red below), then click on the Record button.
Click on the Options menu. Choose the appropriate audio source, in this case Loopback Audio.
Go to the application that was set to play the video; press play (hopefully you queued up the video to play at least 5 seconds before the area you wanted to capture – this will usually give time for the application to hide any playback controls which might be distracting).
After you’re done recording:
Stop the video in your application that was playing your video.
At the top of your screen (to the right of Finder menu items), click on the black square, which is the button to stop the Quicktime recording. Save your video file.
Go to System Preferences/Sound. In the sound Output, change the preference back to Internal Speakers (or whatever was your original choice). You should be able to hear sounds now from your speakers.
Use the best/right microphone (microphones are available from IMC and PARC for checkout).
Record in the right space (not in loud environment; turn off heaters/AC/radios, ideally in quiet carpeted room; wood amplifies and bounces sound).
When recording, make sure to drink water regularly, otherwise the microphone may pick up “dry mouth” sounds or noise.
Be wary of recording outdoors, especially with wind or other background noises (such as traffic or leaf blowers) that may make and voice recording inaudible.
Monitor the sound being recorded; make sure levels are good (not too quiet or too loud).
Balance the interviewer and interviewee sound sources. This is an example where the interviewer’s voice is too loud, and the interviewee is hard to hear: https://vimeo.com/103869564
Balance sound throughout video so that the viewer doesn’t have to increase/decrease the volume to hear all the details. Note the initial loud sound vs the interview sound): https://vimeo.com/96644748
There are many media file types that exist for images, audio, and video. A file type that works in one situation make may not work in another. For example, an upload that you need to make might take .png files but not .tiff. Maybe the audio file you are trying to email or upload is too big and you need to compress it. Video files can be particularly problematic due to their size, or perhaps the software you are using accepts only certain formats. The number of possible file types and codecs (technologies for compressing and decompressing files) are seemingly endless and it can be daunting to keep track of this ever-changing landscape. If you don’t want to download multiple apps that facilitate different conversion tasks you can download Adapter and do most everything in one app.
In this tutorial I am going to show you how to route your computer’s system audio output into a piece of audio recording software. Some potential situations that you would want to do this for would be as follows. What if you needed to record the audio from a Skype or FaceTime session? Or you wanted to do some creative re-sampling of a piece of audio? Maybe you want to record something from the web like Tone Generator (a frequency generation tool only available on the web), like a student and I did for RAW (Reed Arts Week) recently. You could also use it for a live situation where you wanted to capture everything you did on your computer.
Playing an instrument is an analog experience: a tangible act based in physical reality. Because of this, when instrument simulating apps (soft synths or virtual instruments) can use the touch paradigm available on iPads, musicians can find themselves having more of an analog experience with that technology. This is useful as music creation has traditionally started via an analog process: playing a string, wind, or percussion instrument, for example. Because of touch technology, the process of playing digital instruments is now able to become more seamless.