Mirroring your iphone to your ipad can be useful in a number of ways:
if you’re sharing your Mac screen with someone remotely such as a Zoom or Google Meet video meeting, and want to demonstrate an app on your iphone or ipad, or want to annotate something that is on your ipad.
if you want to record actions performed on your mobile device, but don’t want to use the native recording app built into the ipad. Click on the record button in quicktime while the device is mirroring, and save the video. (If you are recording your mobile device you may want to review some screencasting tips – these apply to your mobile device recording as well!)
You can record yourself using your Mac laptop provided it has a webcam (most do, embedded at the top of your screen panel). Make sure you’re recording yourself in a quiet environment, with no televisions or radios on in the background.
Go to the QuickTime Player application. Choose File/New Movie Recording.
You should see a live video of yourself. To begin recording, click the red record button (a round circular button) similar to this image:
When done recording, click on the stop button (a black square), similar to this image:
Save your video file. Choose File/Save.
If you’re needing to send this file to someone at Reed:
Open a web browser and go to filerobot.reed.edu, and in the “Drop off large files” section of the screen, type in the person’s name you are sending to.
Choose the video file you saved by choosing the “Choose Files” button, and selecting the file. Keep the browser open until the message “File Robot has received the following files” appears, similar to the image below.
To trim a QuickTime video clip, open the video file in the QuickTime Player application.
Go to Edit/Trim in QuickTime Player.
Choose the area you want to save by dragging the yellow handles; the content highlighted in the yellow rectangle will be the clip that will be saved.
To fine-tune the start and stop, you can also use the left/right arrow keys to nudge the playhead left or right, then type “i” to move the starting point to the playhead’s position, or type “o” to make the ending point at the playhead’s position. As another option, you can click and hold on the yellow slider to get a zoomed in view of the playhead, and do more precise edits in that view.
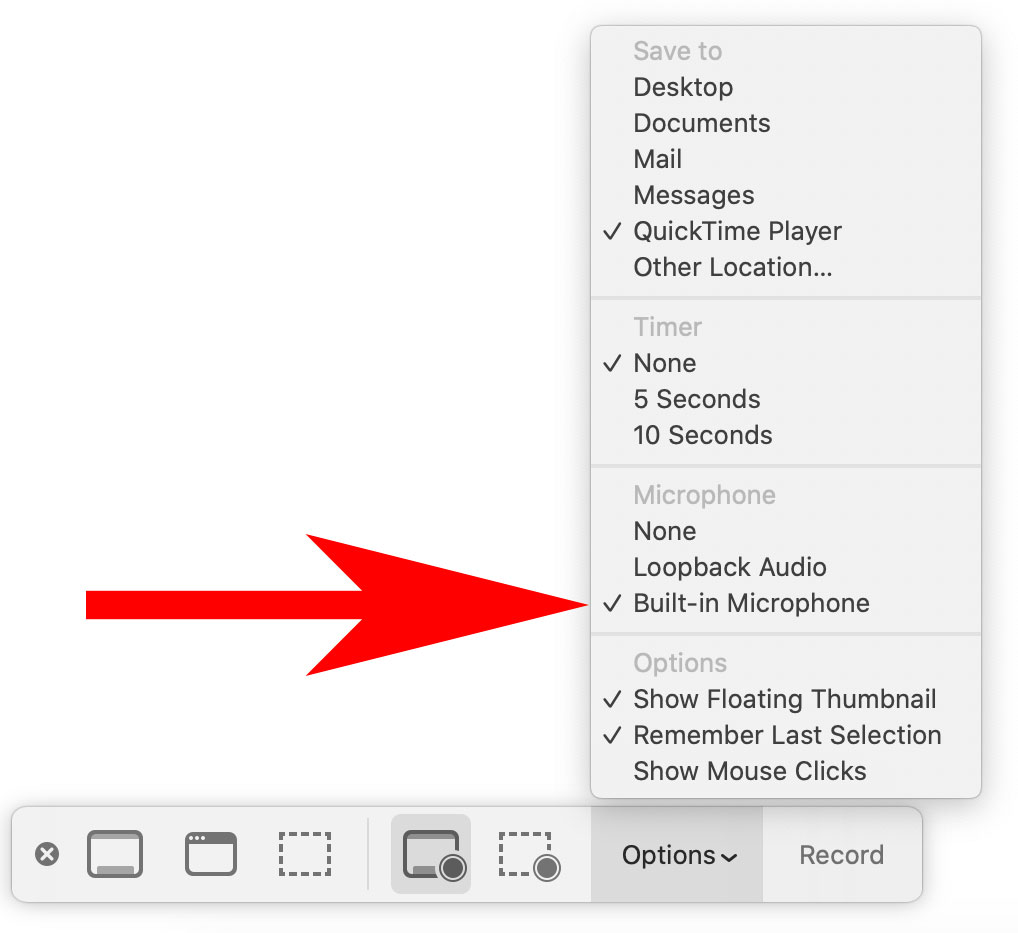
Go to the QuickTime Player application.Choose File/New Screen Recording. If you want to record audio (such as a voiceover) while you’re recording your screen, click on the small icon next to the record button, and select the appropriate Microphone source. Otherwise, audio recording won’t occur.
Choose if you want to record all your screen, or a portion of your screen (options are highlighted in red below), then click on the Record button.
Click on the Options menu. Choose the appropriate audio source, which should be your built-in microphone, unlesss you have an external usb microphone.
Go to the application you want to record the screen activity.
After you’re done recording your screen:
At the top of your screen (to the right of Finder menu items), click on the black square, which is the button to stop the QuickTime recording.
Quick tip: For any screen recording, remember that any motion on the screen will draw your viewer's attention. Minimize your mouse movements to only those necessary to draw the attention to an important part of the screen, or an action that needs to be taken.
Screen Capture and Screen Recording Quick Tips:
If recording your screen, clean up your desktop to have your viewer have less distractions, which will help them focus on your content.
Try to minimize your mouse movements to only those movements that are important to capture.
Temporarily put all your desktop items into one folder, ideally in a location away from the desktop.
Temporarily make the desktop background image a solid color.
Hide your dock.
Choose full screen (if it’s available) with the application that you’re going to screencapture.
If you’re recording a browser, close out any tabs that you won’t be using for your screencast or screen capture, and hide any bookmarks.
Note: This will record a video of your Mac's screen, but not audio that may be streaming on a web browser; to record both video and audio, please view this page.
Open the media you want to screen capture in your application (if it’s a browser, use Firefox or Chrome, not Safari). Start at least 5 seconds before where you want to start – this will usually give time for the application to hide any playback controls which might be distracting. Don’t press play yet.
Go to System Preferences/Sound. In the sound Output, choose Loopback Audio in the Output tab. At this point, you will hear no sound from any of your Mac’s applications, but don’t worry.
Go to the QuickTime Player application; choose File/New Screen Recording.
Choose if you want to record all your screen, or a portion of your screen (highlighted in red below), then click on the Record button.
Click on the Options menu. Choose the appropriate audio source, in this case Loopback Audio.
Go to the application that was set to play the video; press play (hopefully you queued up the video to play at least 5 seconds before the area you wanted to capture – this will usually give time for the application to hide any playback controls which might be distracting).
After you’re done recording:
Stop the video in your application that was playing your video.
At the top of your screen (to the right of Finder menu items), click on the black square, which is the button to stop the Quicktime recording. Save your video file.
Go to System Preferences/Sound. In the sound Output, change the preference back to Internal Speakers (or whatever was your original choice). You should be able to hear sounds now from your speakers.
There are many ways and techniques to tell a story visually, even if your subject may be a bit difficult to present visually. Here are a few samples that show how some people have creatively put together projects using a variety of different techniques:
Using Timelinejs for a timeline-driven piece. While not a video-driven piece, this is a great tool for visualizing a timeline, and putting it onto a webpage. Plus, there’s no scripting involved beyond copying-pasting the embed code into your webpage. Loads of great examples for inspiration.
Screencapture. I’m using this term to describe taking static shots of your Mac’s computer screen, rather than recording motion on your Mac’s screen. You can take a screenshot of your entire screen, or just a portion of your screen, or a screenshot of a window. Read these mac screencapture tips to do all these things.
Screencast. Record your screen while you are showing something visually with your mouse, writing on the screen, annotating a written piece, or recording a slideshow while you are doing a voiceover. Be sure to check out the article on screencasting tips too!)
Example: Area of a Composite Figure.
Animate still photos. This helps to create a “living image”
Example: Funny frog. This video was created from a still image. Note the music used to further enhance the video.
Ken Burns effect. You can zoom about an image to focus the viewer on a specific part of an image. This is perhaps one of the easiest ways to draw a viewer into your topic.
Example: Ken Burns Effect
Timelapse. Record a timelapse video of your topic.
Example: What if the World Went Vegetarian. Fun video shot on a whiteboard.
Animation. You can create animation, or use software to aid you, to create something visually that will help to tell the story.
Example: Troy Library. Uses software animation to present the topic.
Example: Animated Life: Pangea. Uses old animation techniques to bring the story to life.
Interview someone. Have someone tell their story, or combine interviews to tell a story. Make sure you are recording them properly, with a good microphone and in a quiet environment. Be sure to read the interview tips on this page too!
Record yourself. Only for those brave enough to stand in front of the camera, but you can record your discussion of your thesis (with fun visuals), like this fellow here: