What makes an experiment into a genuine work of science? Spending long hours in the lab? Possibly. Repeating your experiment over and over again so that you become confident in your results. That’s certainly important. But for any experiment to make the leap from personal experience to “genuine work of science” something more is needed. You need to create and pass along a record of your work to the rest of your scientific community, and this record must pass a high bar: it needs to be sufficiently accurate and detailed that other scientists can repeat your experiment. Only when your work is passed along in this way does it enter into the communal knowledge that we call “science”.
The contents of your lab notebook are the starting point for creating a formal record of your lab work. This means that anyone reading your notebook finds a legible, scientifically accurate, and complete description of your actual experimental procedures and observations.
Actual, not planned. We emphasize ‘actual’ because notebook traditions vary. You may have been instructed in other lab courses to enter your plans into the notebook before lab, and then add corrections and observations as your lab work proceeds. This is not acceptable in Chemistry 201/202. You must record all operations and observations as they occur in the lab, not before.
Another important function of your lab notebook is to enable successful lab work. To this end, we expect you to prepare your notebook before lab with all of the information needed to make your lab work efficient, informed, and safe (this includes instructions for the proper disposal of chemicals when the experiment is complete).
While the purpose of a lab notebook is pretty much the same for every scientist, a Chemistry 201/202 lab notebook will necessarily look quite different from a Chemistry 101/102 (or biology, physics, psychology) notebook. Every scientist performs specialized experiments, each with its own characteristic requirements for record-keeping and supporting information. With this in mind, please read all of the following sections of this appendix carefully (there are also helpful ‘notebook’ sections in Padias). We know there is a lot to master here, and to add to the challenge, we are expecting you to bring a properly prepared notebook to every lab session (notebooks will be checked at the start of each session), so please read this appendix in its entirety. Refer back to it whenever you have questions and do not hesitate to contact the lab instructor.
Choosing and setting up your notebook
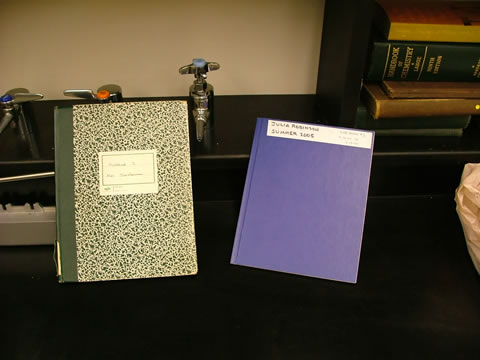
- Your lab notebook must be bound. Spiral and loose-leaf notebooks are not acceptable. We recommend the inexpensive CompBook sold in the Reed College bookstore (“College Ruled” is best); one CompBook should easily last you the entire year. In general, do not use a notebook that has been used for another course (an exception may be made if the notebook has been used very lightly; ask permission and be prepared to show them your notebook).
- A spectrum of writing implements and styles exist. The ideal: neat, print entries made in waterproof ink (waterproof pens can be purchased from the Reed College bookstore). Absolutely prohibited: pencil and/or illegible entries.
- Outside front cover. Print your full name and “Chem 201/202.”
- Inside front cover. Print your full name, “Chem 201/202,” Reed email, Reed box number (or street address), and 5 emergency phone numbers for Community Safety, Health Center, Environmental Health & Safety (EHS), Police/Fire/Ambulance, and Poison Control (obtain these 5 numbers from the list published by EHS).
- Page numbers. Number the upper corner of first right-hand 20-30 pages of your notebook sequentially now. These numbers will be used in your Table of Contents. More pages can be numbered as needed during the year.
- Page 1-2: Table of Contents. A Table of Contents is required. This lists the Title of each experiment in the notebook and the page number for the first page of the experiment (the page where the Title is located). Reserve the first two pages of your notebook for your Table of Contents (this means the entries for Exp’t #1 begin on p. 3).
Right-page rule
The Rule:
- RIGHT pages – Contain required supporting information (see below) + official record of the experiment
- LEFT pages – Contain unofficial entries including, but not limited to, work plans (not actual records) and calculations
Open your notebook so it lies flat in front of you. Two pages face you and organic chemists generally treat these pages differently according to The Rule given above. This means all of the required entries in your notebook – the required supporting information for your experiment (structural formulas, physical properties, etc.), your procedure, your observations – will appear on the right pages. Whatever appears on the left pages is unofficial. It will not be read or considered except to make sure that you are prepared for lab (see below). Southpaw exception. If you are left-handed and you find it more convenient to flip The Rule, go for it, but be consistent. Do this for your entire notebook.)
The Rule would appear to privilege the right page over the left page, but that doesn’t mean you will shun the left pages. We expect you to write the instructions for your planned work on the left pages before lab. As a rule, we will not allow you to consult this lab manual during your lab session so it is essential that you come to lab equipped with work instructions. Because plans have a different status from actual procedures and observations (see above), the informal left pages are the perfect place to enter your plans.
Plans can be written in any style that serves your needs. A handwritten, word-for-word copy of the manual’s procedure? An abbreviated of the manual’s procedure written as a list or outline of our procedure? Drawings of equipment? All of these are acceptable options. Enter whatever information you need to get through the lab (you can even write in pencil if you want), but put your plans on the left pages, and your work record on the right.
Padias alert. The instructions in Padias (Padias pp. 5-16) for keeping a notebook are to be followed except in one respect: Padias does not follow the Right-Page Rule (see example notebook on Padias pp. 8-11). Therefore, when it comes to page usage, do not follow Padias’ example. Enter required information on the right side only.
Required entries
The official entries for each experiment must be entered on the right pages (see above). Start each experiment on a new (right) page. Beginning at the top of the page, and continuing on following (right) pages as needed, enter the following information in the sequence listed:
- Title (enter on first page of experiment and in Table of Contents)
- Chemical equation or Materials List
- Table of physical properties and desired amounts
- List of relevant hazards and instructions for safe handling (see Safety appendix)
- List of disposal instructions (see Disposal appendix)
- Dated, detailed description of procedure & observations
Items #1-5 must be entered into your notebook before you begin each experiment and before you come to lab. Looking up this information and writing it into your notebook is a required part of the pre-lab preparation (the other required part of the pre-lab preparation is to enter the experimental instructions on the left pages). Items #1-5 only need to be entered once for each new experiment, not each week.
Item #6 must be entered only after you start working in the lab. This is vital. Remember, do not enter anything before you do it. Some students are tempted to write instructions in their notebook ahead of time, for example, they might enter,
“Mix acetic acid (__mL), concentrated sulfuric acid (__ mL), and isopentyl alcohol (__mL) and reflux (__min). Solution turns ___.”
Then they fill in the blanks as they perform the experiment. This is totally unacceptable. You cannot write your procedure before you come to lab. (Procedural plans are another matter, but they go on the left pages. See above.)
Two columns? Another, and potentially unacceptable, practice is to divide the right pages into two columns: procedure + observations. We strongly discourage this as a way of recording procedure and observations (see below). However, we absolutely forbid doing this if the procedure column is filled in before lab. Remember (how many times have we said this?): plans need to be entered on the left pages, actual work needs to be recorded on the right pages, and you cannot describe what you have done until after you have actually done it.
Please read the relevant sections in Padias p. 5-16 for detailed information on what to write and where to write it. The example on p. 8-11 (apart from the indiscriminate use of left and right pages and the two columns) provides a very nice illustration of what a notebook should look like and should be studied carefully. Note: some of the instructions in Padias will not be immediately useful. Skip irrelevant items for now, but remember to check these pages again later.
Sample 201/202 notebook entry
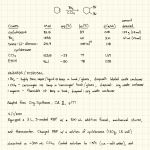
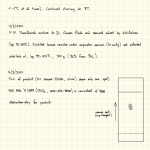
The following images show what the RIGHT pages of a notebook entry might look like for a routine organic lab experiment. Click on the images and compare their contents with our instructions.
Notice that the pre-lab entries (title, chemical equation drawn using structural formulas, table of physical properties, hazard warnings/disposal instructions) take up no more than half of the first page.
Also notice that the transition from pre-lab entries (supporting information) to in-lab entries (work record) is indicated by the entry of the first date on which the lab work was performed (4/1/2001). The work for this experiment took place on three successive days, and each date is written in before any of the work for that day is recorded. When the record moves to a new page, the date is entered again ahead of the work. Also, the transition from one page to the next is indicated by notes at the bottom (“cont’d p. 13”) and top (“cont’d from p. 12”) of the relevant pages.
A few more comments:
- Chemical Equation. The chemical equation indicates the purpose of the experiment: to combine the reactant with other reagents and obtain the specified product. The chemical equation is drawn using a combination of structural formulas for the organic reactant and product, and chemical formulas and abbreviations for standard reagents and solvents. Materials List option: If the goal of the experiment is to make a new compound, you must always draw a chemical equation. However, if the goal of the experiment is to make measurements on a list of compounds, you should instead write “Materials” underneath the title, and draw the structural formula and chemical name for each compound that will studied.
- Procedure and Observations. The procedural record is written out in sentences; we do not use the two-column approach. Equipment (“RBF” = round-bottom flask, Claisen flask, etc.) is specified, and so are all operations (“charging” a vessel means placing a compound in the vessel) such as stirring, cooling (the cooling materials, ice-salt water, are specified), distillation, and so on. Critical observations, the ones that provide information another chemist would need to have in order to repeat the experiment, are embedded in each sentence. They are not listed separately. So, in the first two sentences we learn the sizes of the RBF (2 L) and addition funnel (500 mL), the identity of the liquid in the RBF (cyclohexene), the amount of this liquid (this is always expressed in two ways: the measured quantity, 120 g, and the number of moles that this represents, 1.5 mol). Subsequent sentences provide additional information about equipment, operations, and critical observations (these include temperatures, start and stop times for procedures, a drawing of a TLC (thin-layer chromatogry) plate and much more).
- Brevity and Your Reading Audience. This record may look amazingly short, but it contains everything a trained chemist needs to know in order to perform the experiment. Assume that your reading audience consists of trained chemists who will know the meaning of words like “filter” and “distill” and “extract” and standard abbreviations like “RBF”, “bp” and “TLC”. However, do NOT assume that they have access to this lab manual. Any notebook entry that describes its procedure with phrases like, “followed the procedure in the lab manual” or “used the apparatus specified in the lab manual” will be marked unsatisfactory.
A final word. It takes time and practice to master any type of writing. This includes lab notebook-keeping, especially in the beginning when the amount of information veers towards overwhelming. Do the best you can. We will be looking at, and evaluating, your notebooks every week, but what counts for us (and we hope for you as well) is that you follow the instructions that have been provided, do this to the best of your ability (which we understand is likely to improve over time), and learn.
Useful pre-lab links
- CRC Phys Consts Organic Compds
Set Structure Matching to “Exact Match”; enter name in Chemical Name; Search; open Details - ChemSpider
Enter name/draw formula;
select Properties - Sigma/Aldrich catalog
Enter name/draw formula;
select Product & desired info - PubChem
Enter name/draw formula; select compound - Reed EHS SDS lookup


