Steam Distillation of an Essential Oil
Background
Cloves – A Short History
Swedish chemist Lars Öhrström has written an entertaining book called the LAST ALCHEMIST in PARIS & other curious tales from chemistry [Oxford, 2013]. The book is exactly what it claims to be: a pastiche of tales, some curious, some enlightening, some involving alchemy, but all told with a solid grounding in chemistry. On p. 42 he begins telling a short tale about cloves and nutmeg:
Their [clove trees] characteristic smell once lingered all over Zanzibar and its archipelago. If you extract the oil from the dried flower buds of the clove tree it will be almost exclusively, up to 95 per cent, composed of a single substance … and our sensations when smelling or eating foodstuffs containing cloves is exclusively due to this chemical and a few other related molecules.
The connection between cloves and nutmeg, which happen to have utterly different odors (go into a kitchen or your local grocery and check this out), is this: nutmeg contains a constitutional isomer of the compound found in cloves. In fact, the two isomeric compounds, eugenol and isoeugenol, can be interconverted by some straightforward acid-base chemistry that we won’t have time to explore. However, whereas the scent produced by cloves is derived almost entirely from a single compound, the distinctive scent of nutmeg is produced by a mixture of compounds. Nature is not only unpredictable, it’s complicated.
Steam distillation of essential oils
An essential oil is defined by Wikipedia as “a concentrated hydrophobic liquid containing volatile chemical compounds from plants.” What Wikipedia doesn’t tell you is that my Google search of “essential oils” produced 375,000,000 hits and that these oils are the basis of a huge industry (many of the hits on the top page of my search were to a seller of essential oil and aromatherapy products). Clearly there is a market for essential oils, but do people really know what they are getting when they purchase something like “lavendar oil” or “eucalyptus oil”? Perhaps your analysis of “clove oil” will give you some insight into this question. Optional reading on essential oils:
- “The Nature of Essential Oils. I. Production”, F.S. Sterrett, J. Chem. Educ. 1962, 39 (4), p 203 DOI: 10.1021/ed039p203
- “The Nature of Essential Oils. II. Chemical constituents, analysis”, F.S. Sterrett, J. Chem. Educ., 1962, 39 (5), p 246 DOI: 10.1021/ed039p246
The first step in separating an essential oil from its plant source is usually steam distillation. In its simplest form, steam distillation involves boiling a mixture of water and some organic material (in this case, crushed and ground clove buds) in a standard simple distillation apparatus. This kind of mixture is called heterogeneous because the organic material is largely insoluble in water (recall the separate layers that ether and water form in a separatory funnel). The theory of vapor pressure states that heterogeneous mixtures follow different rules from those followed by homogeneous (uniform) mixtures, like those in the Whiskey Flavorings experiment.
To begin let’s review the theory and practical consequences that you had learned for homogeneous mixtures:
- Pv(mix) = X(A) Pv(A) + X(B) Pv(B)
- The mixture’s vapor pressure, Pv(mix), is always somewhere in between the vapor pressures of the pure compounds, Pv(A) and Pv(B)
- Boiling occurs at the temperature when Pv(mix) = Pext
- The mixture’s boiling point is always somewhere in between the boiling points of the pure compounds
- “Somewhere” is defined by the mixture’s composition, X(A) and X(B). The vapor is enriched in the lower boiling (more volatile) compound so the mixture’s composition is always changing and so are its vapor pressure and boiling point
Now let’s contrast this with the expected behavior of heterogeneous mixtures:
- Pv(mix) = Pv(A) + Pv(B)
- The mixture’s vapor pressure is always greater than the vapor pressure of either pure compound alone
- Boiling still occurs when Pv(mix) = Pext
- The mixture’s boiling point is always below the boiling points of the pure compounds
- In the ideal case, the mixture’s properties are not related to its composition. The mixture’s boiling point will remain constant as long as both compounds are present. However, the vapor will still be enriched in the lower boiling (more volatile) compound
The essential oils that attract so much commercial interest tend to be made of compounds that would boil at high temperatures, but actually decompose at lower temperatures. Direct distillation of plant matter is ineffective therefore. However, by combining the plant matter with water, we obtain a mixture that will boil (steam distillation) no higher than 100 ºC (the boiling point of water) and produce a vapor that contains both water molecules and organic molecules derived from the plant.
Purification scheme
This is a complicated experiment and it is useful to have a mental picture of what is being accomplished at each step:
- Grinding. This breaks down the clove buds into smaller particles and increases the exposed surface area of the buds. This should speed up the transfer of molecules from the interior of the bud to the solution, and then to the vapor phase.
- Steam distillation. This volatilizes the organic molecules at a “low” temperature (≤ 100 ºC) and produces a distillate that is partly “oil” and partly water.
- Liquid-liquid extraction & drying. This moves the organic molecules in the distillate into an organic solvent. Drying removes any water molecules found in this solution.
- Evaporation. This removes the solvent at a low temperature. The oil will be left as a residue in the boiling flask and must not be overheated (see warning about temperature sensitivity above).
- Thin layer chromatography (TLC). This separates compounds in a mixture according to their mobility over a solid stationary material (silica gel). You will use this to see how many compounds appear to be present in your oil and also to compare the compounds in your oil with pure samples of compounds that have been found in essential oils.
- Dry column flash chromatography. This relies on the same principle as TLC. However, in this technique, the compounds travel all the way through the solid stationary material and are collected at the end. Because different compounds travel at different speeds, they will appear (and be collected) at different times. The idea here is to separate and collect pure samples of each of the compounds found in your oil so that each compound can be analyzed using NMR spectroscopy.
Thin layer chromatography (TLC) overview
This technique is analogous to GC, except that it is used to separate nonvolatile compounds. You can use TLC to find out how many compounds are in a mixture. You can also use TLC to find out whether two samples contain the same compound.
TLC is such a powerful technique that we have purchased several books about TLC for our library. However, these probably contain much more information than you will want (or need) to know.
There are also numerous web sites devoted to TLC. Most of these are sponsored by companies that sell TLC supplies and are not worth visiting. Here’s a good one from the UC Davis ChemWiki that includes useful diagrams and photos.
For those of you who only need a quick reminder, here is a simplistic explanation of TLC and how it works.
The separation is performed using a TLC plate. The “plate” is usually a piece of plastic that is coated on one side with a highly polar solid substance like silica gel.
Silica gel is the stationary phase. It doesn’t go anywhere during the procedure. Compounds that adhere strongly to silica gel don’t go anywhere either.
The surface of silica gel contains a large number of Si-OH groups. O carries a partial negative charge because of the highly polar SiO and SiOH bonds and H carries a partial positive charge. Consequently, silica gel is a good hydrogen bond donor and acceptor, and hydrogen bonding compounds stick tightly to silica gel. (Ionic compounds stick so tightly to silica gel that they generally cannot be separated in this way.)
After a sample is applied to the silica gel, the “sample” end of the TLC plate is dipped in a solvent. The solvent soaks into the plate, and moves upwards, carrying the sample with it. Nonpolar compounds move the farthest, while more polar compounds (the ones that stick more tightly to silica gel) tend to stay near the bottom.
You can adjust how far a sample moves by using solvents of different polarity. Solvent molecules and sample molecules compete for binding sites on the silica gel. If the solvent is highly polar, it will win the competition (there is a LOT of solvent) and drive all of the sample upwards. If the solvent is nonpolar, the sample will win the competition and stay near the bottom of the plate.
In our experiment, you will mix two solvents – hexanes (nonpolar) and ethyl acetate (polar) – to generate the solvent polarity you need.
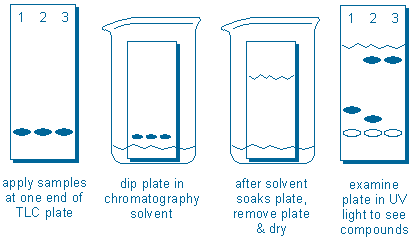
The sequence of operations are illustrated in the following diagram:
Compounds are applied to the plate. The plate is dipped in solvent. After the solvent soaks upwards through the plate, the plate is removed from the solvent and dried. UV light can be used to locate the new compound positions (the empty ovals do not represent compounds; they are included just to show the starting points of each sample).
In this example, we would conclude that Samples 1 and 3 appear to contain one compound each, but sample 2 contains at least two compounds. In addition, the fast moving (less polar) compound in sample 2 is probably the same compound found in sample 3 because both compounds have traveled the same distance.
TLC in practice
A TLC experiment involves several steps, and some practice is required before one can obtain useful results from TLC. Briefly, a TLC experiment requires one to 1) make up solutions of each sample to be tested, 2) apply the samples to a TLC plate, 3) elute the plate (this means dip the plate in a solvent and wait), and 4) visualize the result (this means identify the locations of the samples on the plate).
The first and third web sites listed above describe each step in a typical TLC experiment, so only a brief summary is provided below.
Step 1 – Make up sample solutions. Compounds are applied as dilute solutions (typically 5-10%) in a volatile solvent, like ethyl acetate. Dilute solutions are used so that the plate does not get overloaded. Overloading means there is so much compound in one location that not all of the compound can reach and bind to the surface of the silica gel. Instead of binding to the stationary phase, the overloaded compound spreads out and makes a big worthless streak.
Step 2 – Apply samples to TLC plate. Samples are applied with narrow glass tubes called capillaries. The idea is to make the initial sample spot as small as possible (preferably 2-4 mm in diameter) because sample spots always grow as they move up the plate. To apply a sample, dip a capillary in your sample solution, and then gently and briefly touch the end of the capillary to the silica gel.
If you need to add more compound to the sample spot, let the spot dry completely first. Then touch the capillary in exactly the same location.
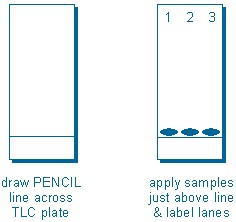
You will usually apply three or four different samples to the same plate so that you can compare them. To facilitate this, draw a pencil line across the plate, or make a small mark at the edge of the plate, about 1-2 cm from (and parallel to) the end of the plate. Form all of your sample spots just above this line. Also, label each lane at the other end of the plate.
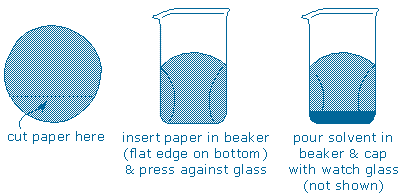
Step 3 – Elute the TLC plate (soak the plate in solvent). To begin, obtain a tall, narrow beaker or jar (your cabinet includes a tall lip-less 250 mL beaker that is ideal. Cut off the bottom from a piece of filter paper and press it up against the wall of the beaker. Pour your chromatography solvent (or solvent mixture) into the beaker and then cap the beaker with a watch glass.
Next, carefully rest the plate inside the beaker. The solvent will immediately begin to soak upwards through the plate, so you must set the plate up so that exactly the same amount of solvent flows through each part of the plate and the solvent “front” rises as a horizontal line. Here are some useful tips:
- Limit the amount of solvent. Do not let the solvent cover or touch the sample spots.
- Stand the plate upright as much as you can. Do not let the edges touch the filter paper.
- Do not move the beaker once you insert the plate. Moving the beaker splashes solvent up the sides of the plate.
- Place the silica gel side towards you so that you can monitor the solvent’s progress.
It is important to stop the plate at the right time. If you stop too early, all of the compounds will be grouped near the bottom of the plate. If you stop too late, all of the compounds will be grouped near the top (compounds gradually collect at the top because solvent continuously flows up through the plate and evaporates). Therefore, the quality of your TLC separation improves and then declines with time.
A good rule of thumb is to wait for the solvent to cover at least 50-70% of the distance between the sample spots and the top of the plate. However, if it looks to you like the solvent “front” has stopped or has slowed down significantly, immediately remove the plate from the beaker.
Step 4 – Visualize the result. Once you remove your plate from the beaker, immediately mark the location of the solvent “front” with a pencil. Then wave it back and forth to dry it (this will inhibit compounds from moving on the plate).
Your TLC plates have been impregnated with a fluorescent dye that glows green when exposed to UV light. The green color is not produced, however, wherever another UV-absorbing compound blocks UV light from reaching the fluorescent dye.
All six of the compounds used in this experiment absorb UV light and all of them will appear as dark spots against a green background. Therefore, you can detect your compounds by examining your plate under a UV light (Danger – UV radiation causes permanent eye damage and skin burns).
Mark the outlines of all significant spots with a pencil. Ignore tiny or extremely faint spots (most of the mixtures are lightly contaminated with a variety of impurities).
Make a FULL-scale drawing of your plate in your notebook. Record the following information on your drawing:
- Solvent front location.
- Initial spot position.
- Exact outlines of all significant spots.
- Solvent mixture used.
- Sample labels
Do not rely on the plates themselves to “save” your information. Plates can degrade in a single afternoon as compounds gradually move around on the plates and evaporate.
TLC Applications
TLC is used in several ways in this experiment. You will use TLC in week #1 to identify the compounds in your unknown mixture. Then, in week #2, you will use TLC to identify column fractions that contain parts of your unknown mixture, and to determine which parts of the mixture are located in each fraction. The procedures for each are slightly different and are described in other sections of this experiment.
Dry-column flash chromatography
You will use this technique to purify a relatively large sample of your mixture (typically 300-400 mg). If you are successful, you will obtain a sufficient quantity of each purified compound to enable NMR measurements to be made on that compound.
This technique was first developed by L. M. Harwood of Oxford University in the mid-1980’s. It differs from other chromatographic techniques (column chromatography, flash chromatography, etc.) in that suction is used to drain the “column” dry between fractions. It has the advantage of being very simple and safe to perform, and under optimal conditions, giving the same resolution as analytical TLC.
The following account is adapted from two sources: L. M. Harwood, Aldrichimica Acta, 18, 25 (1985) and from J. T. Sharp, I. Gosney, A. G. Rowley, “Practical Organic Chemistry“, [Chapman and Hall, 1989], pg. 160-163. It has also been described in A.J. Shusterman, P.G. McDougal, A. Glasfeld, Journal of Chemical Education, 74, 1222 (1997). Students and teachers who would like to use this technique to separate other mixtures (and use this technique on a different scale) should consult one of these other sources for more general instructions.
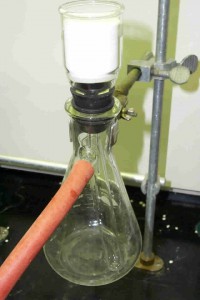
Briefly, dry-column flash chromatography requires you to set up a sintered glass funnel. You should use a cylindrical funnel with a medium porosity frit set up as if for a vacuum filtration (see below) and pack dry TLC-grade silica gel (e.g. Merck Kieselgel 60, particle size ~15 mm) into the funnel.
The combination of funnel and silica gel is referred to as a “column”. You apply your sample mixture to the top of the column, and pass solvent mixtures (“fractions”) of gradually increasing polarity, one at a time, through the column while you apply suction. Each “fraction” (solvent + whatever compounds are leaving the column) is collected in a test tube and the size of the test tube dictates how much solvent you pass through the column.
Once you have collect several fractions you can analyze their contents using TLC. Some fractions may be “empty”, i.e., pure solvent. Other fractions may contain some component of your essential oil and you will need to use TLC to determine whether these fractions contain just one compound or multiple compounds. Fractions that contain the same compound (and nothing else) are combined and the solvent is evaporated to obtain samples suitable for IR and NMR analysis. The relevant experimental details are described in the Procedure section.
Continue to Procedure…


