Synthesis of Isopentyl Acetate
Procedure
Pre-lab preparation
The pre-lab preparations should be familiar now. Prepare your notebook by:
- Writing a title and a reaction scheme
- Constructing a table of physical properties (MW, mp, bp, density) for the compounds that you will handle in this experiment (acetic acid, isopentyl alcohol, magnesium sulfate, diethyl ether, isopentyl acetate)
- Concentrated sulfuric acid (H2SO4) and saturated aqueous sodium bicarbonate (NaHCO3) are provided as solutions. Your table should list MW for pure compounds (convert MW to the weight and volumes you need e.g. acetic acid) and concentrations for solutions.
- Listing any unusual hazards that a lab worker should be aware of. Although an odor is not normally regarded as a “hazard” unless it is foul (“stench”), make an exception for the odor of isopentyl acetate (banana oil). Although its banana-like odor is not particularly unpleasant at first, most students do not enjoy long-term exposure to this odor.
- Listing disposal information for all compounds
- Calculating the amounts of reagents that you expect to use (left notebook page and/or under a column called “amount desired” in your table – make sure you list the units)
Online videos. Videos of the procedure being performed at Reed are available in the Moodle. You are also welcome to review any of the following videos on lab procedures. The Interactive Lab Primer videos tend to focus on procedures without providing much explanation:
- Simple Reflux (full video)
- Solvent Extraction (full video) and
Extraction, Washing, Drying - Drying Liquids (full video)
- Simple Distillation (full video) and
Fractional Distillation (focus on connection between temperature & liquid collection)
You may want to watch the Extraction, Washing, Drying video from MIT. It does a much better job of explaining the language, rationale, and practice of these techniques.
Equipment
The procedure for this experiment provides less information about equipment than previous experiments. We assume that you will be able to figure out your equipment needs partly from prior experience and partly by consulting reference materials.
Rule-of-thumb for container size: When estimating the size of a container (beaker, flask, separatory funnel, etc.), estimate how much material will be placed in the container and then double that amount to get the container size. In other words, never fill a container more than half full. This allows for unexpected gas release and foaming.
Naturally, the ‘half-full’ rule has many exceptions. If your material is exceptionally volatile, release large quantities of gas, likely to boil or generate large quantities of foam, use an even larger container. On the other hand, if you are simply storing a nonvolatile material in the container, you can get by with a smaller container.
Wear gloves and goggles and carry out all operations in a fume hood.
Week 1: Reaction
In your fume hood place a stirring motor on top of a partially opened lab jack, then place a heater on top of the motor. Clamp a clean, dry, 100 mL round bottom flask to the monkey bars (support rack) in your fume hood so that it rests in the heater. Stacking and clamping equipment in this way is standard procedure. A lab jack is nearly always used to support stirring and heating equipment so that you can safely separate the heater from the flask without having to grab the heater or flask (hot!). The lowest piece of glassware in any apparatus (usually a round bottom flask) must always be clamped; it should never dangle from other glassware. See Padias p. 23 for description of Thermowell heater, and p. 31 & 33 for drawings (left side Fig. 1-12 shows our setup minus the lab jack; top Fig. 1-13 shows flasks immersed in ceramic heaters). Plug the heater into the controller, but do not turn on the controller (never plug a heater directly into a wall socket).
Combine isopentyl alcohol (0.15 mol) and acetic acid (2-3 molar equivalents) in the flask. Molar equivalents are described in the Calculations appendix. Add a stir bar and mix the liquids well. Next, add concentrated sulfuric acid (1 mL) to the flask and attach a reflux condenser and water hoses. Water should flow into the bottom of the condenser and out of the top to condense solvent vapor most efficiently. Slowly flow water through the reflux condenser and adjust the controller voltage to initiate reflux. Reflux means to boil a solution at a sufficient rate so that its vapor condenses in the apparatus above the flask and runs back down into the flask. The controller voltage required to initiate and maintain reflux must be established by trial-and-error (Padias p. 31). Reflux your mixture for 30 minutes while stirring then stop heating the mixture and allow it to cool to room temperature.
Week 1: Work-up
Special reading: the next “work up” steps, extraction/washing and drying, are routinely used to separate ionic and neutral organic compounds. In this experiment, extraction/washing separates sulfuric acid and acetic acid (water/base layers) from isopentyl alcohol and isopentyl acetate (ether layer). The ether layer is also “wet” because it has been in contact with water, so it must be dried to remove residual water. These procedures are described in Padias p. 116-125 and p. 125-128. Study Figures 3-5, 3-7, and 3-8 particularly carefully so that you understand what is going on. A mistake at this point might accidentally send your product down the drain.
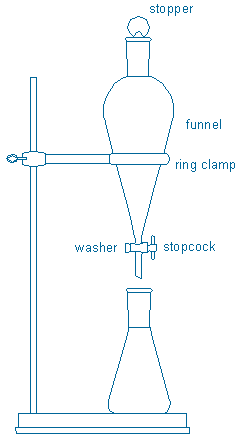
Clamp an iron ring in your fume hood. Rest a 250 mL separatory funnel on the ring, and place an Erlenmeyer flask under the separatory funnel. Use an Erlenmeyer flask large enough to hold the liquid that you will drain into it. A 250 mL flask will definitely hold all of the liquid in a 250 mL funnel. Notice that a separatory funnel consists of several parts: tapered stopper (teflon or glass), funnel, stopcock + washer (or spring clip). All of these parts are needed. The stopcock + washer should be adjusted so that they fit snugly in place and will not allow liquid to leak around them.
Transfer the cooled reaction mixture to the separatory funnel. Add 50 mL water to the mixture. Extract the aqueous solution once with 40 mL of “wash grade” diethyl ether. Next, carefully wash the ether solution with one, two, or three additional 40 mL portions of saturated aqueous NaHCO3 until the bicarbonate layers are neutral or basic. During these operations, extracting and washing refer to identical operations with different goals. Extract always means that a desired compound (in this case, isopentyl acetate) will be moved from its current location (reaction mixture + water) into an extraction solvent (diethyl ether). Wash always means that an undesired compound (acetic acid + sulfuric acid) will be moved from its current location (diethyl ether) into the wash solution (aqueous base). Padias p. 130-135 describes the chemical reactions and solubility changes that enable seemingly identical extraction and washing operations to achieve their intended purposes. Draw a chart like that in Figure 3-8 inside your notebook (left hand page) that shows how the four compounds in this experiment – acetic acid, isopentyl alcohol, isopentyl acetate, and sulfuric acid – will behave during your workup procedure.
Warning: Residual acetic acid and sulfuric acid will react vigorously with NaHCO3 and release lots of gas. Don’t mix your layers until the gas evolution appears to have stopped, then mix them cautiously (and vent the funnel frequently). After each wash, drain the aqueous layer into a new flask so that you can test its pH with pH paper. You should continue washing the ether layer with fresh portions of wash solution (and draining these washes into different containers) until a basic or neutral wash layer is obtained.
Next, drain the diethyl ether layer into an Erlenmeyer flask and dry it over anhydrous MgSO4. Gravity filter the dried solution to remove the MgSO4 and rinse the spent drying agent with a small amount of anhydrous diethyl ether (from this point onward, use only anhydrous diethyl ether whenever diethyl ether is called for).
If you have time, proceed to week 2. The endpoint for week #1 will vary from student to student. Fast workers are encouraged to distill some or all of their ether solution. Most students will simply store this solution until week #2. Because banana oil and diethyl ether both produce objectionable vapors, these solutions must be stored in the cabinets underneath the fume hoods (the cabinet vents to the hood). Place your solution in the (clean, DRY) round bottom flask that you will use for the distillation, cap the flask with a Teflon or glass stopper, and rest this flask inside a beaker (choose a beaker that will keep the flask upright). Place a piece of paper inside the beaker with your NAME, LAB DAY, and FLASK CONTENTS.
Week 2: Distillation
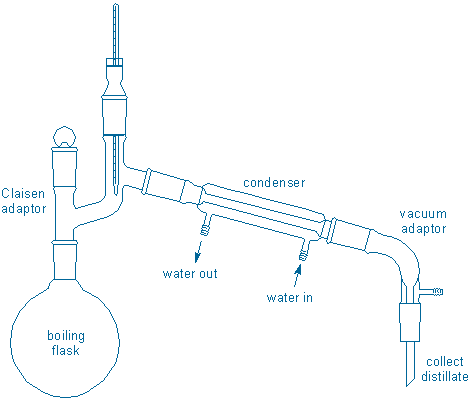
If all has gone according to plan, your liquid is a dry mixture of diethyl ether, isopentyl acetate, and possibly isopentyl alcohol. The next step is a simple distillation of this liquid. The distillation procedure is essentially identical to the simple distillation that you carried out in Experiment 1 and will use the same apparatus (don’t forget boiling chips!)
Your apparatus should look something like the following drawing. A standard metal clamp is used to support the boiling flask since it is near the heat source and will get hot. Plastic joint clips are used to attach the condenser at each end, and to attach the collection flask to the vacuum adaptor.
Three important points: 1) your simple distillation will not be able to separate compounds with similar boiling points so plan to collect compounds of this sort as a single fraction, 2) collect each fraction in a dry, pre-weighed round bottom flask (prepare a clean, dry flask of suitable size for each fraction you expect plus a similar flask for each ‘transition’ fraction), 3) change collection flasks (fractions) whenever the distillate temperature begins to change in a meaningful way. You do not need to collect small fractions or record detailed T vs. volume data (you will not be constructing a graph of these data), but you should record the boiling temperature range of each fraction.
Weeks 2/3: Characterization & data work-up
- Weigh your product
- Analyze it for impurities using gas chromatography (See Padias pp. 164-165; 181-189 for information about this technique)
- Record its FT-IR spectrum
- Prepare an FT-NMR sample and leave it with your instructor
NMR (or FT-NMR) is the most powerful characterization tool available to organic chemists (See Sorrell chapter 13 and Padias pp. 77-104 for detailed descriptions of this all-important research tool).
FT-NMR measurements will be made for you during the week. You will return to lab the following week (Week 3) to access and process your NMR spectrum during the proton NMR workshop. Although we will assist you in downloading and analyzing your NMR data for this experiment, you will be expected to do this on your own in future experiments. Detailed instructions for preparing NMR samples and working with NMR data are provided in the Instrumentation appendix.
Continue to Report…

