
Audacity is a free open source audio editing program developed for macs, pcs, and linux, and can be downladed at https://www.audacityteam.org/. There are plenty of help documentation online, but here are a few quick tips to get you started.
Quick note: If you are running Audacity on Catalina, you may need to read up on how to make Audacity work in Catalina. Ideally if you run this code in the terminal, Audacity will work:
open /Applications/Audacity.app/Contents/MacOS/Audacity
Audacity’s tools
Audacity has a number of toolbars, but these are the most commonly used:
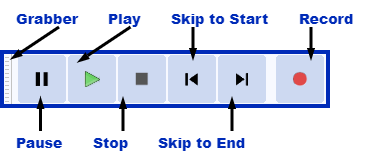
- transport toolbar
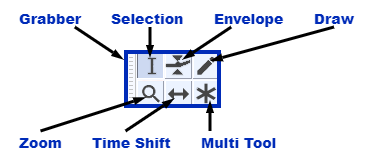
- tools toolbar
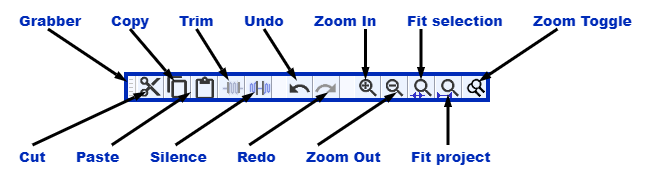
- edit toolbar
- recording meter toolbar

This will indicate when your recording is too quiet (very little green showing, in the -54 range) or too loud (in the red, or at zero); ideally you should record in the -18 to -12 range. - playback meter toolbar
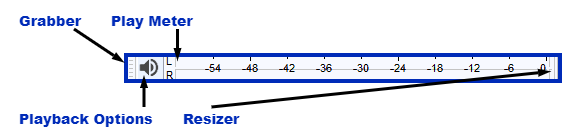
You should have audio levels not go into the red (at the 0 range).
note: all toolbar images used from https://www.audacityteam.org/
Common Tasks in Audacity
There are a number of common tasks done when editing audio with Audacity. Here are a few of them:
- Add, trim, split, move an audio clip
- Mute or solo and audio clip
- Increase/decrease the volume of an audio clip
- Loop an audio track or selection
- Exporting
Add, trim, split, or move an audio clip
Add an audio clip: Drag and drop audio onto Audacity’s interface. Mp3, .aiff, and .wav files usually are good. You can also choose File/Import/Audio.
Split: Edit menu/Clip Boundaries/Split
Trim a selection: highlight a selection that you want to save, the choose Edit/Remove Special/Trim Audio. (many options here!)
Move a track: Highlight the audio you want to move, then choose the Time Shift tool. Drag the audio to the preferred location.
Mute or Solo an audio clip
Click on Mute or Solo on an audio clip’s track (indicated by the read arrow, at the top left on an audio track) to either mute it, or make it the only audible sound on playback. Mute/solo can be done on multiple clips.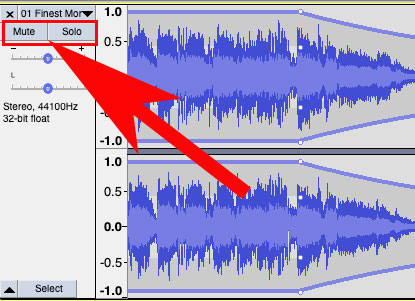
Increase/decrease the volume of an audio clip
Increase: You can either manually move the volume up by dragging the volume slider left or right (indicated by the red arrow, located just below the Mute and Solo buttons on the audio track). 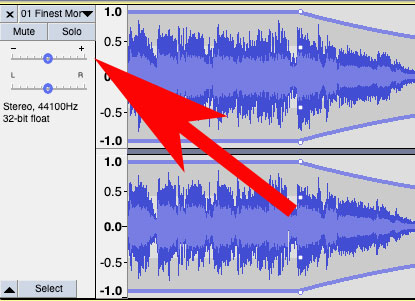
Or, you can choose the Envelope Tool, then drag up. 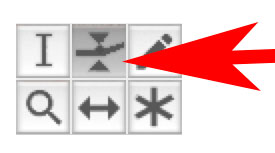
The audio waveform should increase. If the clip is already at its maximum, highlight the clip, then choose Effect/Amplify. Drag the amplification slider to a larger setting.
Decrease: Choose the Envelope Tool, then drag down. The audio waveform should decrease.
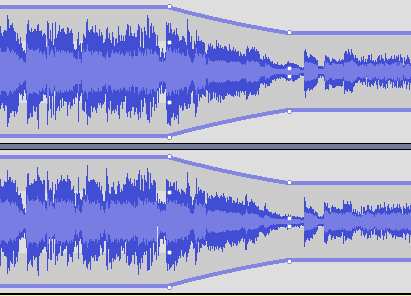
Sound ducking: An audio term that is used when one temporarily decreases/increases the volume of one audio source so that another audio source can be heard more readily.
- Choose the envelope tool; click-drag down to make the initial volume setting. Choose another point where you want to increase/decrease the volume, then click-drag again.
- To remove the white keyframe points, click-drag the white point upwards.
Loop an audio track or selection
- With the selection tool, click and drag on the area you want to loop.

- Go to Transport/Playing/Loop Play (keyboard shortcut: Shift-spacebar)
Exporting an audio clip
To get the highest quality (uncompressed audio file), choose Files/Export as WAVE signed 16 bit. Click OK on any warnings.