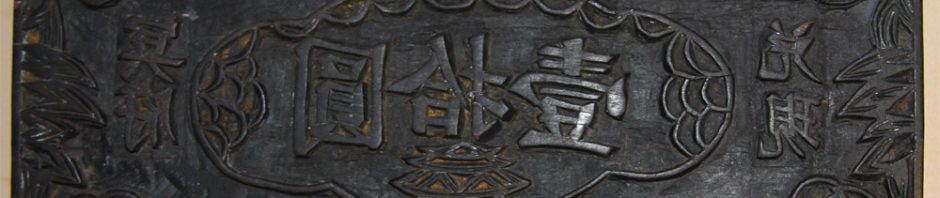
For this project, the goal was to make a print from a Chinese wood block. The block depicts paper money that, after made into a paper print, is then burned up as an offering to ancestors during the annual Qingming Festival.
We didn’t want to use the original block itself for making prints for fear of causing damage to the original artwork, so we hoped to make a reproduction of the artwork. This was a great time to use the physics building’s laser printer, which could burn artwork into a linoleum block. From that, we’d create a replica of the printing block, then make new prints.

The overall plan was to scan in the block, make an Illustrator file, and then use that as the template for the replica print block. However, simply scanning the block proved to be problematic. Since the entire original block was a solid dark color, it was impossible to easily isolate the edges of the print design to make a usable file. To combat this problem, we took a roller and coated the raised printing portion of the block with a thin layer of white acrylic paint. After this was complete, a was taken which easily showed the separation between the foreground and background of the print. Since we used acrylic, the paint was easily washed off without any harm done to the original block.

The next step was to take this scan, and turn it into a usable illustrator file. This process began with cleaning up the edges in photoshop and making sure there were no grey or fuzzy areas. After it looked good in photoshop, we turned the selection into a work path, and exported the path to illustrator. It was important at this point to make sure that the selection was inverted (to select the carved portion of the block in black), since the laser printer uses the color black as info for what gets cut away.

Then, all that was left to do was adjust the laser printer settings until we found something that worked for our printing material. For our replica, we used a linoleum block, which we had to be mindful of, since rubbery materials tend to melt a little bit in the laser cutter. We ended up doing several passes with the laser cutter to make sure all the edges remained clean, as trying to cut too much away at one laser pass could result in melting or burning.
The final print block turned out alright! (though the smell from the laser cutting the linoleum block was absolutely dreadful) We also ended up scaling the entire design up a bit in order to better fit the size of our piece of linoleum.
